Thank you for filling out the form. One of our mobile experts will be in touch shortly to discuss your inquiry.
If you have any other questions please feel free to email us directly at info@mitto.ch
Thank you for filling out the form. One of our mobile experts will be in touch shortly to discuss your inquiry.
If you have any other questions please feel free to email us directly at info@mitto.ch
Mitto’s SMS Campaign Manager makes it easy to create and manage all your SMS campaigns. Import your contacts quickly. Create campaigns and get real-time, detailed data about the SMS messages you send.
This guide provides details about all features of the Campaign Manager.
If you want to send SMS outside of the Campaign Manager, check out our SMS API documentation.
If you need to sign up for Campaign Manager credentials, you can go here: https://www.mitto.ch/contact/
Log in to the customer portal to get started. After you log in, you will be able to:
To get started, do the following:

NOTE: If you forgot your password, click Forgot Password, enter your email address in the field provided, and click Send.
NOTE 2: For security reasons, if you do not use the Campaign Manager for more than 30 minutes, the Campaign Manager automatically logs you out. Remember to regularly save your campaigns, or any draft action. If you see the loading symbol appears for more than few seconds you may need to log in again.
When you first log in to the Campaign Manager, you arrive at the Dashboard screen. The top righthand corner of the screen offers some helpful tools that appear on every page. This is referred to as the toolbar.

Left to right you have:
When you click the Tooltips icon, you get a dark gray information box that appears for the first field in the screen you are on. The information box provides a description of each field on the screen. To cycle through, click the purple Next button. To the right of the word Next on the button is a counter that shows you how many fields there are to cycle through for descriptions. For example you might see Next 1/8. That means there are eight descriptions on the page and you are viewing the first one. If you do not want to cycle through all the descriptions, click Exit to go back to your screen.
When you click the Notifications icon, you get a panel containing the most recent three notifications sent to you. You can click Mark All as Read at the bottom right corner of the panel to get rid of the number over the Notifications icon. (The number represents how many new notifications you have.) You can also click Show All. If you do this, the Campaign Manager takes you to the Notifications screen.

The screen includes all the features detailed in the table.
| Screen Feature | Description | ||||||||
| Search Bar | The search bar lets you type a term that may be found in the Content section of the Notifications table. Click the Magnifying Glass icon to run a search. | ||||||||
| Magnifying Glass icon, Filter By | Click on the Magnifying Glass icon or Filter By to open a panel on the right side of the screen. This is the Filter panel. You can use the drop-downs to search by Status, Type, and Tag. For each of them you can check or uncheck the boxes to indicate which criteria you want to include in your search. If you choose not to run the search, click Cancel at the bottom of the panel. If you want to run the search, click Search at the bottom of the panel.
|
||||||||
| Heading Checkbox and Row Checkbox | The heading checkbox lets you select all items on the page. When this happens, a purple bar appears at the bottom of the screen. You can choose whether to mark all items as unread, read, or archive them. If you use a checkbox in one of the rows, you can make the same choices, but only for that row or rows that you click the checkbox for. | ||||||||
| Type | The type column displays an icon representing either Success, Error, Warning, or Info. You can hover your mouse over the icon that appears here to see which one it is. | ||||||||
| Content | The content of the notification appears here. | ||||||||
| Tag | The tag tells you generally what the notification is about. You will see either Campaign, Distribution list, Email confirm, or Budget. | ||||||||
| Creation Date | The date the Campaign Manager created the notification. | ||||||||
| Items per page Drop-down | You can set the items displayed per page using the drop-down. Available choices are 15, 25, 50, and 100. | ||||||||
| Page Selector | You can use the page selector in the bottom right corner to move back and forth between pages of notifications. |
The Users screen is available to Administrator accounts, the User manager, and any custom account where you offered this privilege. 
| Screen Feature | Description |
| Search Bar | Enter the name of a user or part of a name to search for them in the list of accounts. |
| Invite user | Use this panel to invite a new user to the Campaign Manager. In the Name field you put their name as it will appear in the tool. For Email, put their email address. For Permissions, you can choose a role or choose custom permissions. Roles include:
Traffic accounts give users privileges within the Campaign Manager. To send campaigns, you must add a user to an active Traffic account of type Campaign. To use the analysis and delivery information tools, you can add a user to any account type, active or inactive. You can add a user to more than one account type if you like. When you are done, click Save. |
| Name | The name of the user. |
| In the picture, the email is hidden, but normally you will see the user’s email in this column. | |
| Presets | This column tells you the user’s role. If they have a preset account, you will know the privileges that way. |
| Status | Status choices include Active, Pending, and Inactive. Active means the user accepted the account and set it up for themselves. Pending means you are waiting for the user to join the Campaign Manager. Inactive is for users that haven’t been in the system in awhile, or where you want to temporarily pause their privileges. |
| Action | You can use the pencil icon to edit the configuration for the user’s privileges and account access. Click the pause icon to make a user inactive, or active again. You can delete a user altogether by clicking on the trash can, then clicking OK on the pop-up. |
The Settings screen lets you update information like your contact information and password and enable certain features.
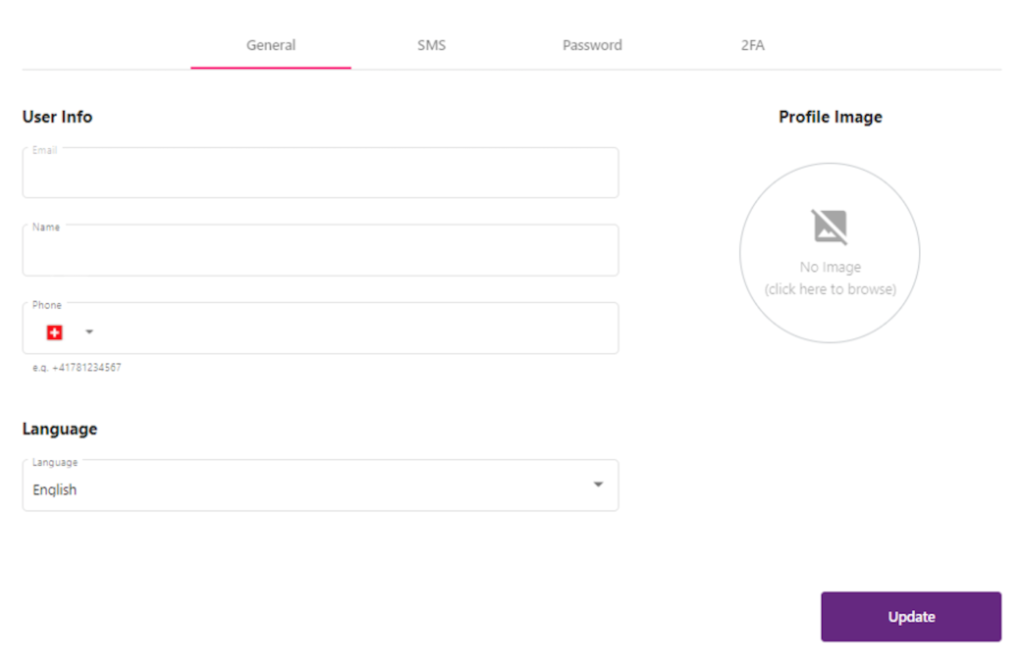
The General tab on the Account Settings screen provides your contact details. The screen features are described in the table.
| Screen Feature | Description |
| The email you use to log in to your account. | |
| Name | Your name. This will be used in correspondence with you. |
| Phone (E.G. +15417963010) | A phone number that can be used for correspondence with you. |
| Profile Image | Upload your profile image. |
| Language | Select your Campaign Manager’s language. |
| Update | Click this button to update any of the fields in the General section of the screen. |
The SMS tab lets you manage your sender ID and the detect unicode charset feature. The details are in the table.
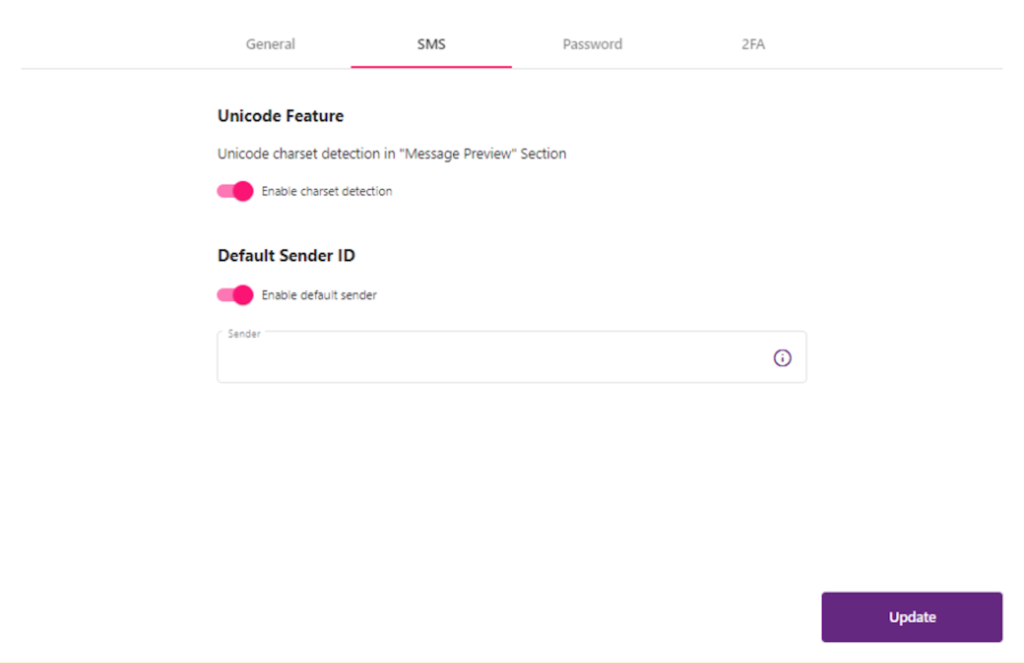
| Screen Feature | Description |
| Unicode Feature | You can toggle the ability to detect what charset is being used. This is used in the Message Preview section. Slide the switch to the right to turn the feature on, and to the left to turn the feature off. |
| Default Sender ID | You can set a default sender ID you want to use when available. Slide the switch to the right to turn the feature on, and to the left to turn the feature off. |
| Update | Click Update to apply your changes. |
The Password tab lets you change your password.
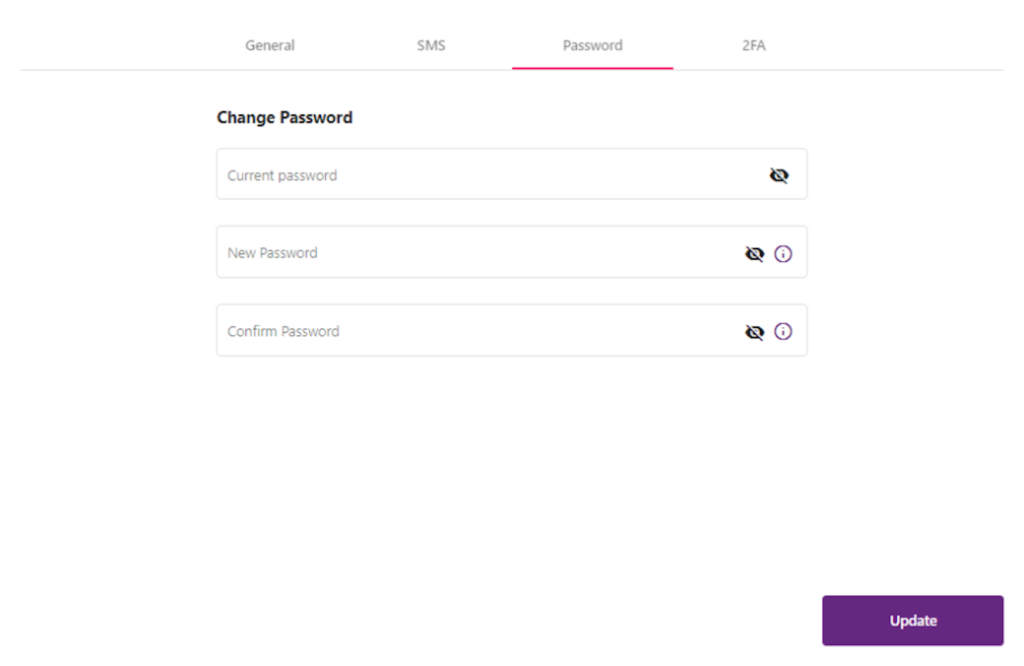
| Screen Feature | Description |
| Current Password | If you want to change your password, you enter your current password here. |
| New Password | Enter the new password you want to use here. Your password must have at least 8 characters, include an upper case letter, a lower case letter, a number, and a special character. |
| Confirm Password | Type your new password a second time to confirm it. |
| Update | Click Update to update your new password. |
For added security, you can use the 2FA section to add two factor authentication to your account.
| Screen Feature | Description |
| Two Factor Authentication | Slide the switch to the right to enable two factor authentication for your account. |
| Update | Click this button to apply your changes. |
The Dashboard screen is what you see when you first log in. It provides at-a-glance information about your SMS traffic, cost, and delivery.
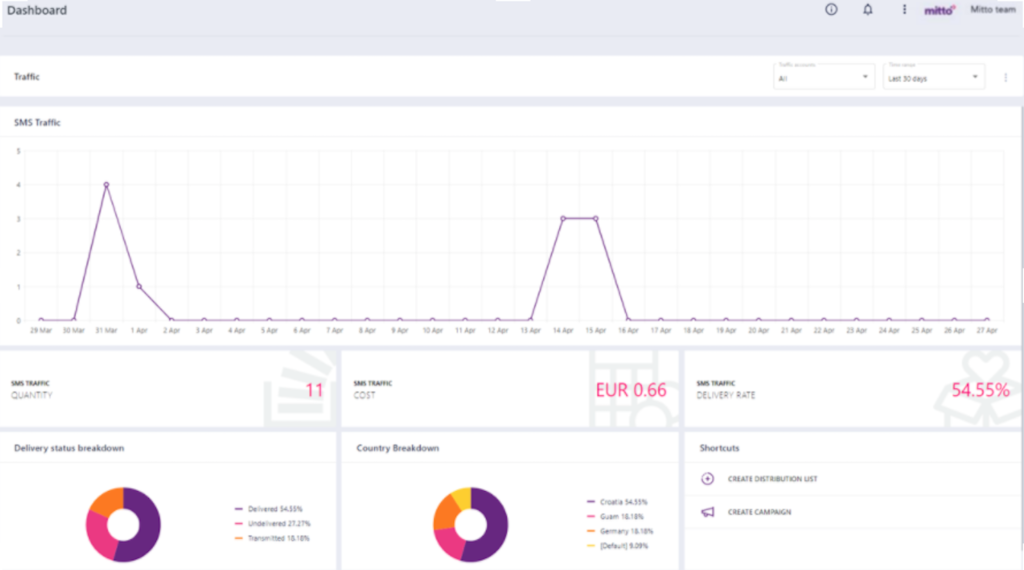
The Dashboard screen’s data is described in the table.
| Screen Feature | Description |
| SMS Traffic Drop-down | Use the drop-down in the right corner under the toolbar to choose how many days of SMS traffic you want to show. Choices include:
Adjusting this will adjust the graph showing how many messages were sent over time. |
| Traffic Accounts Dropdown | Use the drop-down in the right corner under the toolbar to filter the data by one or more traffic accounts. |
| SMS Traffic graph | The graph shows number of messages sent along the y-axis, and the time period along the x-axis. The time period can be changed using the SMS Traffic Drop-down. |
| SMS Traffic Quantity | The amount of SMS messages sent in the time period you chose in the drop-down. |
| SMS Traffic Cost | The cost of all the SMS messages for the time period you selected. |
| SMS Traffic Delivery Rate | The percentage of successful SMS messages delivered in the time period you selected. |
| Delivery status breakdown | A chart showing you the percentage of undelivered SMS in purple and the delivered SMS in gray. |
| Country breakdown | The breakdown by country of messages you sent. |
| Shortcuts | This tile provides a shortcut to:
|
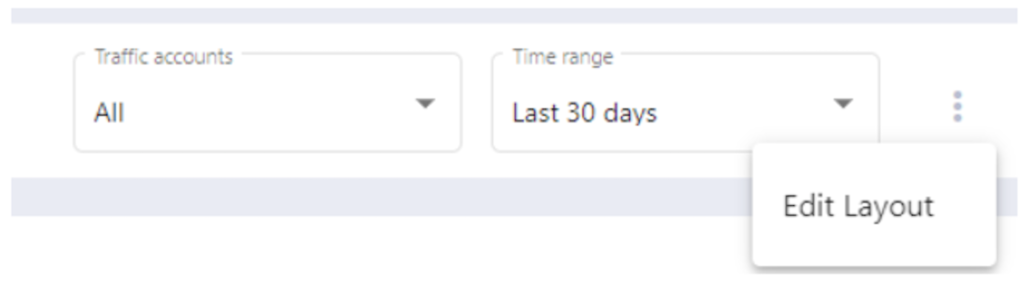
You can customize what traffic accounts you see by clicking on the overflow menu and choosing Edit Layout.
After you click this choice, you enter edit mode. In edit mode, you can:
A distribution list is a list of recipients you want to target with a campaign. In the case of the Campaign Manager, it’s a list of phone numbers you want to receive an SMS.
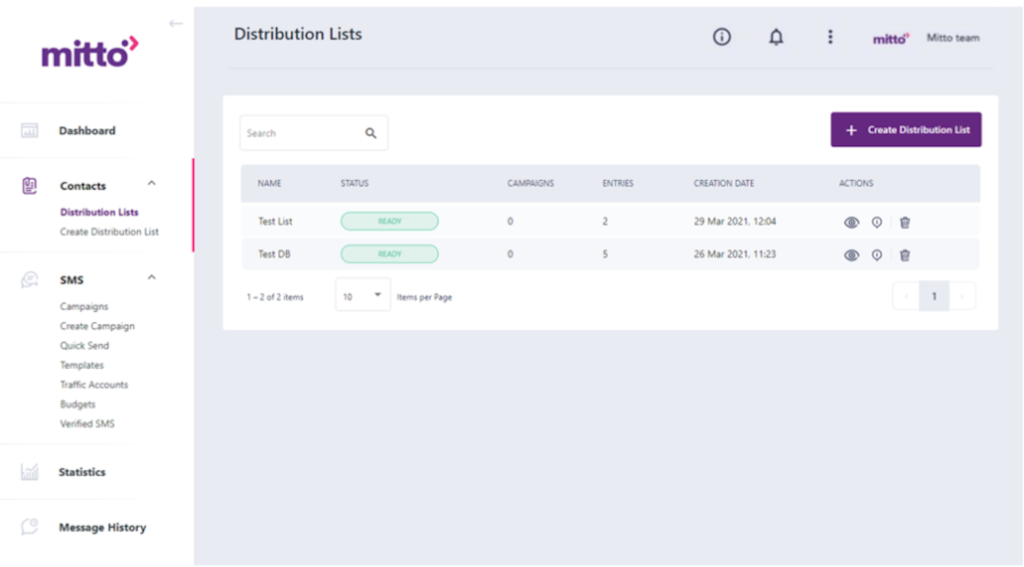
The Distribution Lists screen’s features are described in the table.
| Screen Feature | Description | ||||||||||||||||||
| Search Bar | Click in the field beside the magnifying glass to type a search term. The search bar is for searching through exact matches in the Name column, and is not case sensitive. | ||||||||||||||||||
| Create Distribution List | If you click the Create Distribution List button, the Create Distribution List panel opens. Here you can put the name of a new distribution list in the List Name field. You can search for existing lists to upload by clicking the Browse button. To see a sample of the format you use to upload a new list, click the Download sample button. The format is also provided in this table.
|
Navigate to the Create Distribution List screen by clicking Create Distribution List under the Contacts section in the left panel. You can create new contact lists using a file you upload, or by manually adding information.
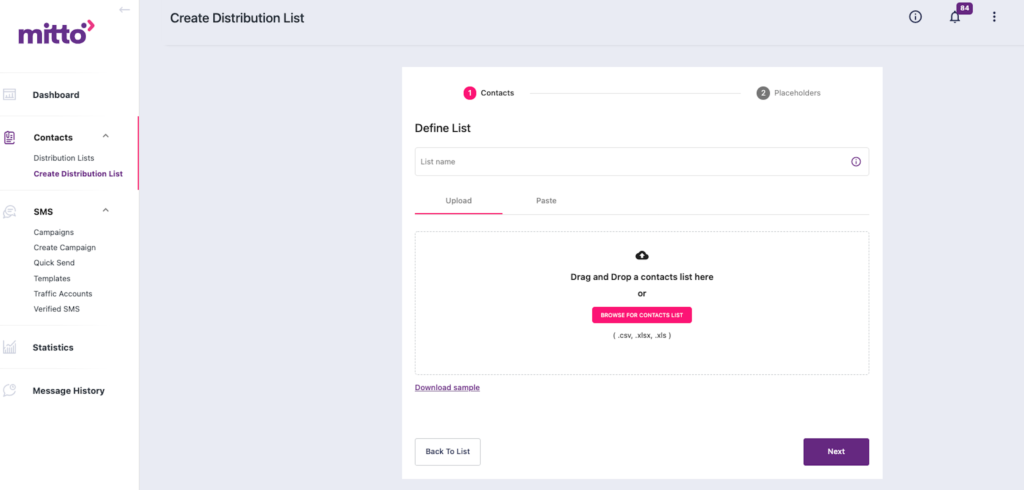
The features of this screen are in the table:
| Screen Feature | Description |
| List name | The title you want to use for your new list. |
| Upload tab | Drag or drop your contacts list to the upload section. You can also click the Browse for Contacts List button and upload your file that way. |
| Paste | You can paste a list of contacts you want to use for the list by clicking the Paste tab, then adding your list by pasting. Contacts are separated by comma, for example: Steve Rogers, 14152348883, New York. You can add a maximum of 2000 contacts, and you can choose the separator you will use from the Separator drop down. Your choices are , ; space tab or |. |
| Download sample | You can click this to see an example of how to format the file of contacts you will upload. |
The Create Distribution List screen has a second screen called Define placeholders. After you fill out the first screen and click next, you get this screen.
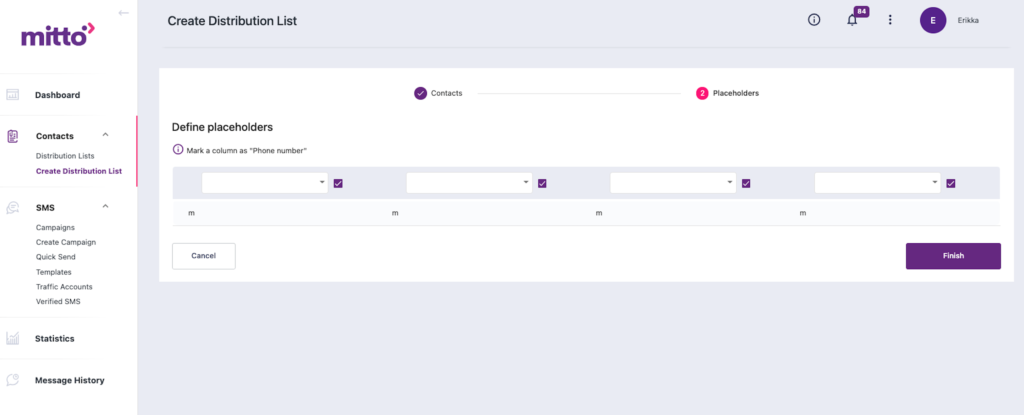
This screen shows you a preview of the data in the contacts list you uploaded or pasted in on the first screen. For each column of data, label it with a placeholder. At least one column must be a phone number. When you are done configuring your data, click Finish to create your new list.
The SMS option in the menu on the left side of the screen opens to reveal three different screens:
The Campaigns screen shows you all your campaigns at a glance. Phone numbers have been covered except for the first digit for privacy.

The features of the screen are discussed in the table.
| Screen Feature | Description |
| Search Bar | Click in the field beside the magnifying glass to type a search term. The search bar is for searching through exact matches in the Name column, and is not case sensitive. |
| Create Campaign | Click Create Campaign to open the Create Campaign screen. This screen is discussed in the Create Campaign section. |
| Name | The name of the campaign. |
| Sender | The name or phone number for the sender of the campaign. |
| Created Date | The date the campaign was created. |
| Schedule Date | The date you scheduled for the campaign to run. If you did not schedule a date, this is blank. |
| Sent/Total Status | The number of messages successfully sent, divided by the total number of messages sent, and multiplied by 100. |
| Actions | You can choose between two actions here. You can click the eye icon to view campaign details. You can click the stack of papers icon to clone the campaign. A pop up will appear asking you for a name to save a cloned copy of the campaign. Enter the name and click Save. If you don’t want to clone the campaign, you can click Cancel to exit the pop-up. |
The Campaign screen shows you details about a specific campaign you clicked on from the Campaigns screen.

The table provides details about the screen features.
| Screen Feature | Description |
| Campaign Title | The campaign title is in the upper left corner of the white |
| Campaign Status | The campaign status displays what phase the campaign is in. The status may be one of:
|
| Distribution Lists | This section contains two rows. The first row displays the name of the distribution list (in the example QL2) and how many rows are in the list (03). The second row tells you how many recipients are in the list (03). |
| Sent | The number of SMS messages that were sent at this point in the campaign. If the status is something besides Completed you may see this number continue to change until completion. |
| Total | The total number of SMSes sent after the campaign completes. |
| Sender | The name or phone number for the sender of the SMS campaign. |
| Message | The message sent for the SMS campaign. |
| SMS Count | How many SMS are sent to ensure the full message reaches each recipient. |
| Characters | The total number of characters in the SMS. |
| Clone campaign | If you want to make a copy of this campaign to use for another campaign, click the Clone campaign button. |
| Message preview | See how the message will appear on a cellphone. |
| Character count – SMS count | The number of characters in the message. The number of SMS messages it will take to send the complete message. This is usually a single message. |
| Campaign Name | The campaign title is repeated at the bottom of the preview for reference. |
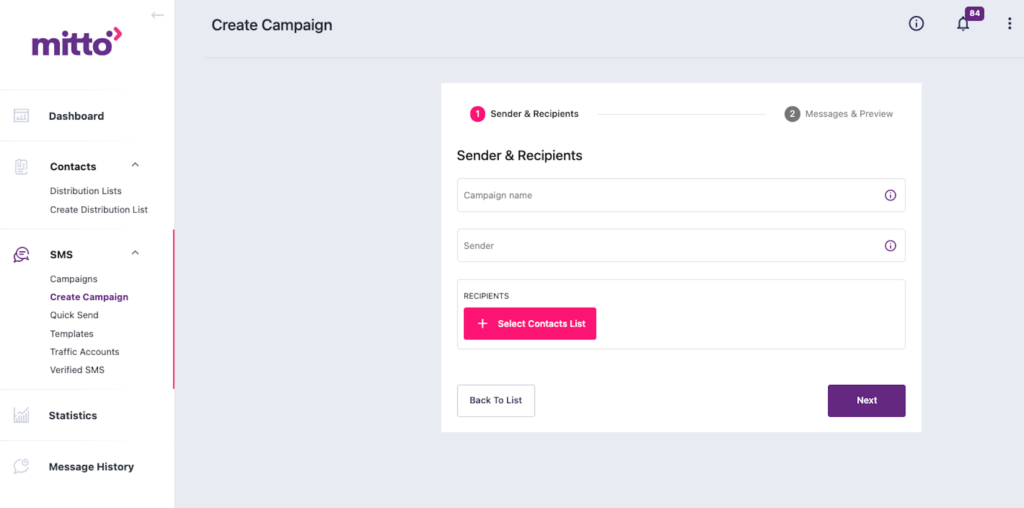
Use the Create Campaign screen to build a new SMS campaign. First, define the campaign name, the sender name, and select the desired contact list.
The Create Campaign screen is described in the table.
| Screen Feature | Description |
| Sender & Recipients | This is a tab that lets you fill out details about your campaign. It is the only tab you can use when you first fill in information for your campaign. |
| Campaign Name | Enter the name of your new campaign. If you hover over the balloon icon to the right of the field, you can see that your title may be from 3 to 50 characters long. |
| Sender | Enter an alphanumeric name for the sender up to 11 characters long or a number up to 16 characters long. If you hover over the balloon icon, this information is repeated. |
| Recipients | Click the Select Contacts List button to choose the distribution list you will use for the campaign. The Select Contacts List panel opens. Enter a search term in the search bar, or use the page navigator to browse through the pages for the list you want. You can see how many recipients will be included at the bottom of the panel. When you choose a list, click Save to use the list and return to the main screen. You can also click Cancel if you want to exit the panel without making a selection.
If you check the Personalize checkbox, you can open the Placeholders panel. Enter a placeholder in the Define Placeholders field and click Add. You can now map this to a column name from your chosen distribution list using the Personalize drop-down. You may add up to two placeholders. These can be inserted into your message, and they will be automatically populated with the value from the column in the table. In this way you can personally address people in your messages. Click Save when you are done mapping on this screen, or Cancel if you don’t want to map anything. |
| Next | Click the Next button to go to the next tab and craft your message. |
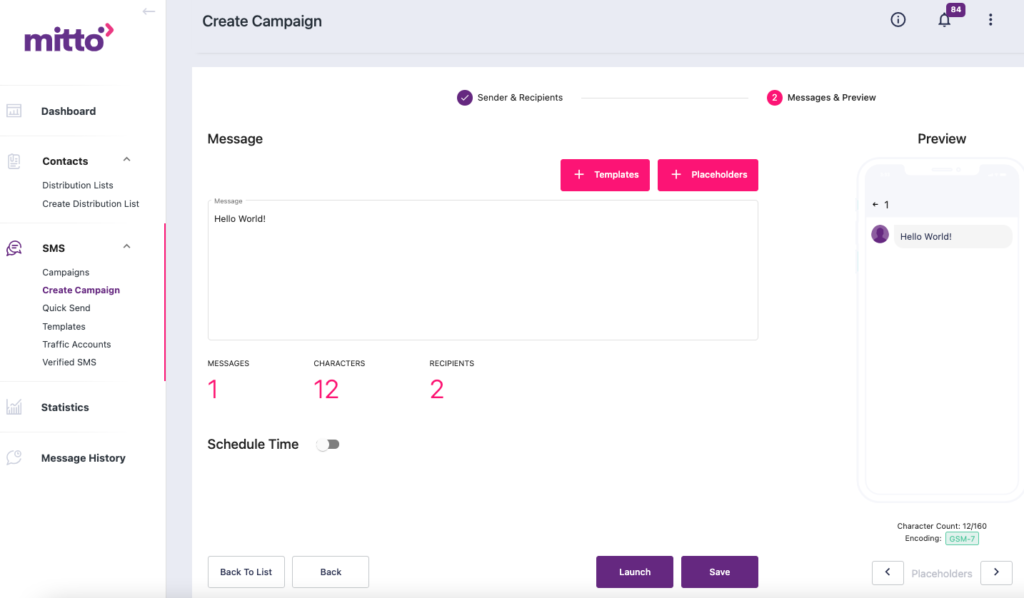
The second screen lets you craft your message, preview it, and schedule the time you will send out your campaign. You can save your work as a draft or launch your campaign.
| Screen Feature | Description |
| Messages & Preview | The Messages & Preview tab lets you add a message and see how it will appear on a cellphone. |
| Message | Enter the content of the SMS you want to send. If you used placeholders or templates, the Placeholders and Templates buttons will be active. Click Placeholders when you want to insert a placeholder into your message or click Templates when you want to insert predefined message content into your message. |
The second screen is where you set up your campaign message.
The features of this screen are in the following table.
| Screen Feature | Description |
| Message & Preview | The Message & Preview tab lets you add a message and see how it will appear on a cellphone. |
| Message | Enter the content of the SMS you want send. If you used placeholders or templates, the Placeholders and Templates buttons will be active. Click Placeholders when you want to insert a placeholder into your message or click Templates when you want to insert predefined message content into your message. |
| Templates | Click the Templates button to choose a template to apply to your message. |
| Placeholders | Click the Placeholders button to choose from a list of placeholders for information like Name, Surname, and Address. These can be fed in from a list so each message is personalized. |
| Messages | The number of SMSes each recipient will receive. It’s usually 1, but if you write a long message, it may be more. |
| Characters | The number of characters in the message you want to send. |
| Recipients | The number of customers who will receive your SMS. |
| Message preview | The preview screen shows your message. If you use placeholders, it provides an example of the placeholder correctly used for the first recipient in the distribution list. You can use the arrows at the bottom of the preview to move through the recipient list to see how each message will be customized. |
| Schedule | If you click the Schedule button, you will bring up a Schedule Time field. You can add when you want the campaign to kick off using DD/MM/YYYY HH:mm format. |
| Traffic account | You have to select an assigned traffic account. |
| Save | You can save your work by clicking Save. |
| Launch | You can launch your campaign immediately if you are ready. If you added a scheduled day and time, the campaign will launch at that day and time. Pushing this button immediately readies the campaign to launch. |
The Quick Screen is for when you want to send an SMS campaign without setting up a distribution list. It’s best for smaller campaigns since you must manually provide all the recipient information.

The table describes the Quick Send screen.
| Screen Feature | Description |
| Sender | Enter the sender name or phone number you want to send the campaign from. |
| Recipients (E.G. +15417543010) | Enter the phone number for each recipient. Press return or enter on your keyboard. It will create an icon for the number. You can delete it by clicking the X next to the number, or by pressing delete twice. You cannot enter more information about the recipient than the number. |
| Message | Enter the content for the SMS you want to send. |
| Messages | The number of messages sent. This updates after you press the Send button. |
| Characters | The number of characters in the SMS you want to send. |
| Recipients | The number of recipients you will send your message to. |
| Message preview | You can see how your message will appear on a phone. You cannot personalize it. |
| Reset form | Click this button to reset the form and start over. |
| Send | Click this button to send your campaign to the recipients. The campaign begins processing immediately. You cannot schedule it for a later time here. If you want to do that, use the Create Campaign screen. |
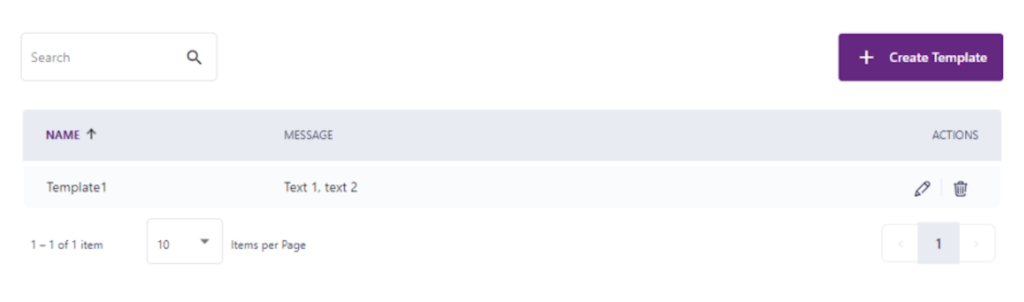
Templates can be found under the SMS section/module and are used for creating predefined messages.

Here is a quick reference guide of available fields and actions for Templates.
| Screen Feature | Description |
| Name | Name of the template. |
| Message | Content of the message. |
| Actions | Available actions: Edit Template and Delete Template |
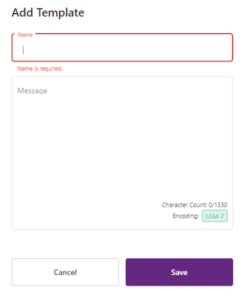
Click the Create Template button to create a new template.
The below pop up will appear. Name your SMS template, write your message, then click Save.
The Traffic Accounts screen shows you details about the different kinds of traffic accounts you have. Depending on what kind of account you have for your users to connect to, different privileges are available in the SMS Campaign Manager.

| Screen Feature | Description |
| Account Name | The name of the traffic account. |
| Display Name | The name you want users associated with the traffic account to see. |
| Account Type | There are three account types:
|
| Status | Status can be Active or Inactive. Active means the account is available for use. Inactive means it is not available for use, so you will not be able to create campaigns or review details about SMS messages. |
| Action | You can click the pencil icon and edit the display name for the account name. |
| Page Navigation | At the bottom of the page you can click the arrows to either side of the numbers if there is more than one page, or click the numbers to move between pages of accounts. You can use the drop down to set the items displayed to be 10, 25, or 50. |
The Statistics screen displays details about groups of messages that were sent. Messages are grouped into batches based on criteria you select. The columns will change based on the criteria you choose and show you how many were sent, delivered, undelivered, and transmitted.

| Screen Feature | Description |
| Filter By Date | If you click in the field under Filter By Date, a menu and calendar pops up. You can use this to filter for the time period you want the message history for. The menu lets you choose from:
If you click in the calendars, the first calendar is for the start of the time period you want messages for, and the second calendar is for the end of the time period you want messages for. |
| Filter By | Click the Filter By button and the Filter By panel appears on the right side of the screen. You can search by:
Each one allows you to search using a set of conditions:
|
| Group By | The Group By button brings up the Group By panel on the right side of the screen. This allows you to decide how to group statistics information in the columns. Check a box to group by that criteria, or uncheck a box to ungroup by that criteria. Choices include:
|
| Table Columns | These change based on how you choose to group batches of messages. However you group them, you will always be able to find out:
|
| Items per page drop-down | Choose how many items to display per page. You can set it to 15, 25, 50 or 100. |
| Page navigator | Click on the page numbers or arrows to navigate through the filtered messages. |
| Export as Excel | Click the Export as Excel button to download all messages in the table to an Excel file. |
The Message History screen provides details about every single message that was sent for your campaigns. (The numbers are blocked out past the first digit for privacy.)

The table provides details about the features of the Message History screen.
If you click in the field under Filter By Date, a menu and calendar pops up. You can use this to filter for the time period you want the message history for. The menu lets you choose from:
If you click in the calendars, the first calendar is for the start of the time period you want messages for, and the second calendar is for the end of the time period you want messages for.
When you have made your choices, click Apply to filter.
| Screen Feature | Description |
| Filter By | Use the purple Filter By button to search by the contents of any field except the sent date, which is handled by the Filter By Date field. The choices include:
When you are done, click Search to filter for messages or Cancel to cancel the search. |
| Column Options | Choose columns you want to display on the Message History screen. Check a box to display, or uncheck to stop displaying a column. The choices include:
|
| Checkbox | If you click the checkbox by the table header row, it will select every message on the current screen. Otherwise, you can select messages individually by clicking the checkbox next to the message or messages you want. |
| Column Headings | These headings are described in the write up for the Column Options button. You can pick and choose what columns to display using that feature. |
| Page navigator | If there is more than one page of messages for your search, you can click available page numbers or use the left and right arrows to browse. |
Two-factor authentication (2FA) is when you require two pieces of proof from someone in order to authenticate them. A common combination is a password and an OTP (one-time password). Mitto offers the ability to create OTPs if you request this feature from your account manager. The complete steps for enabling 2FA and phone verification are:
NOTE: As an Administrator or User manager, you can easily check which users have enabled the 2FA feature. You can find out the information by opening the Users page and checking the 2FA enabled column.
| Date | Feature | Description |
| June 14 2021 | Added new graphs/metrics in the Dashboard | Users now have option to see following data: country cost breakdown pie chart, traffic per country table and network breakdown table. |
| June 14 2021 | New improved Message History module | The Message History module is now improved with several features: added options to filter by campaign and traffic account, export as an Excel feature, added Reports page where users can see and download all available reports. |
| May 25 2021 | New upgraded Dashboard module | The updated Dashboard module now has the option to filter statistics by traffic account and to customize the Dashboard on desired way. |
| May 25 2021 | Upgraded Distribution Lists (Contacts) module | Added option to quickly identify detailed information for a created distribution list, upgraded process of creating distribution list. |
| May 25 2021 | New Create Campaign flow | Create Campaign flow is now divided into 2 steps, added option to add predefined templates or placeholders. |
| May 25 2021 | Added templates submodule | Templates can be found under the SMS section. Users now can use Templates to create and save message templates which they often use. |
| May 25 2021 | Two-factor authentication and phone verification | Added an option to enable two factor authentication. NOTE: This feature can be enabled only on demand |
| Nov 23 2020 | Settings |
The Settings page is now divided into three tabs offering:
|
| Nov 23 2020 | Additional options in the Toolbar | The More button opens a drop-down menu with useful information. |
| Nov 23 2020 | Verified SMS by Google | Mitto, as a Google Partner, offers Verified SMS (https://mittoc/products/verified-sms). To register an agent on the Google platform, please use this form to submit your data. |
| Nov 23 2020 | White-label mode | The white-label mode offers the option to change the look & feel of the tool, enabling a branded user interface. |