Introduction
Mitto Conversations simplifies communication with customers. Providing an integrated omnichannel experience, you can easily communicate across diverse channels and platforms. The following features area available:
- Send and respond to customer SMS messages, WhatsApp, Viber, or other communication channel of your choice.
- Chat with other team members.
- Track customers with remarks and use filtered inboxes to see messages that are closed, open, or assigned to you.
- Set up your preferences for how you receive message alerts.
- Organize agents into teams to easily assign messages to a group instead of to the specific agent.
- Create custom labels to use for incoming customer messages. Labels can have a priority of high or normal.
- Use powerful search features to dig through content in a variety of different ways.
- Import contacts individually or by CSV file.
- Create assistants that use AI to answer common customer questions. Monitor the assistants and step-in when necessary.
- Get instant in-depth analytics within the tool itself.
Setup
To get started with Mitto Conversations, do the following:
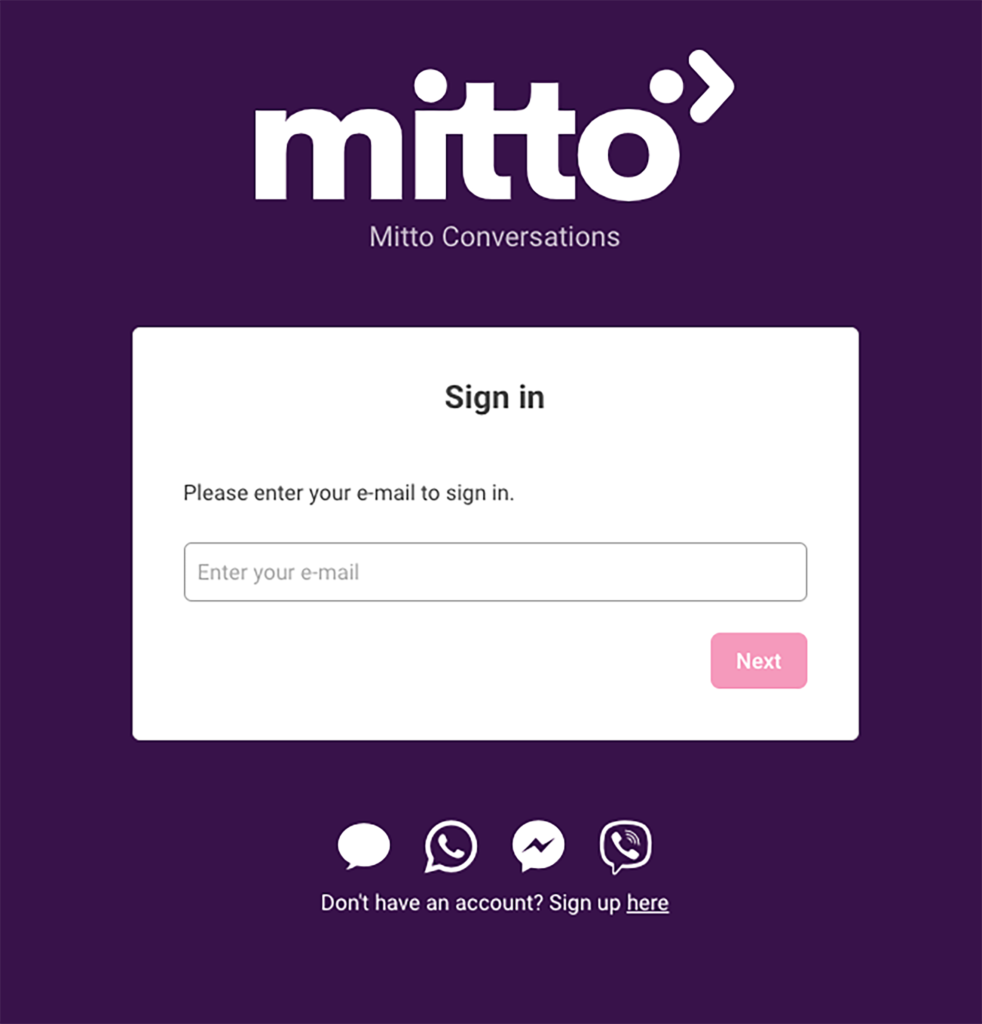
- If you don’t have an account, click here in the Sign up here sentence at the bottom of the screen.
- If you have your credentials, then enter your email in the Enter your email field.
- Click Next.
- On the next screen, in the Enter your password field, input your password.
- Click Sign in. Mitto Conversations opens under the Conversations section with your inbox open.
Dashboard
Mitto Conversations opens in the Conversations section. However, you may want to start by getting acquainted with the basic layout. That’s what this section is about. We’ll go over some of the choices you’ll see used over and over as you navigate around the different areas of Mitto Conversations.
Toolbar and Menu
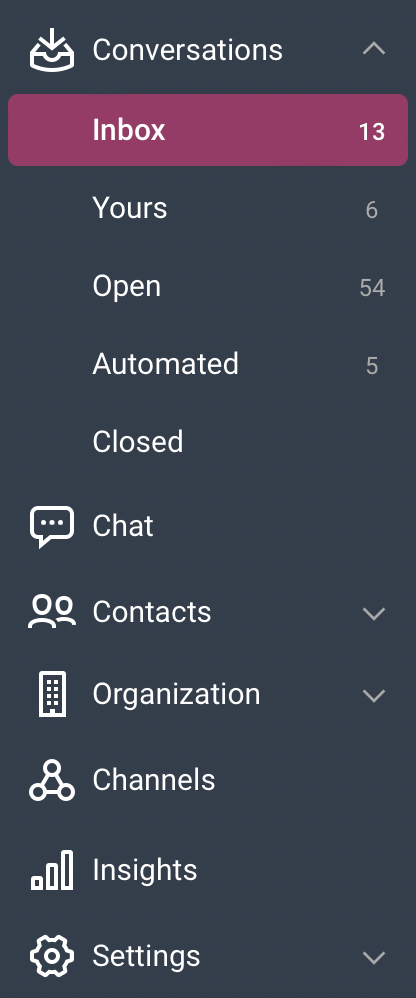
The Toolbar and Menu are on the left side of Mitto Conversations.
Color Circle with Initials
By default, when you open Mitto Conversations, a color is chosen for your profile, and the first two letters of your email address are presented in all caps. If you click the circle, you will get a little popup menu that looks like this:
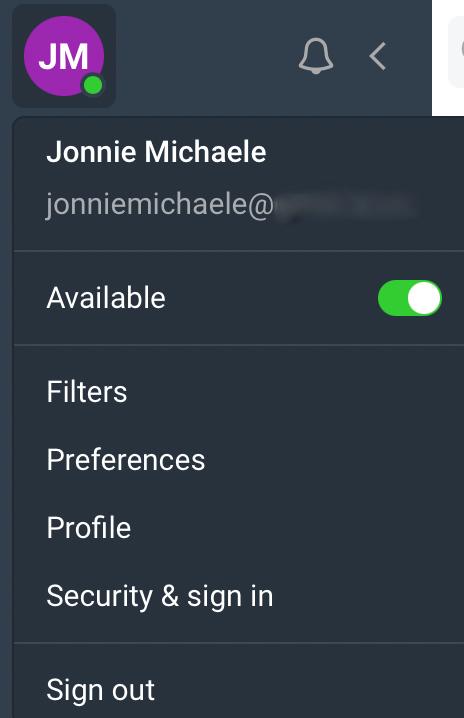
The information in the panel is presented in the table. You will notice the popup segments for each choice, so the table matches each segment.
| Screen Feature |
Description |
| First name and email |
Your first name or nickname and contact email appear here. |
| Available
Filters |
Toggle between Available (green) and Away (red)
| Filter |
Description |
| Teams |
If you are part of more than one team in Conversations, you can choose whether you’ll see all teams or one specific team conversation. |
| Channels |
If you are using multiple communication channels within Conversations, you can choose to see the conversations only within a specific channel or within multiple channels, or all of them. |
| Label |
Mark labeled users you want to see, from high priority clients to whichever label you choose. |
|
| Preferences |
This opens the Preferences panel. You can set your preferences for:
| Preference |
Description |
| General |
Toggle through the general settings and adjust them to your own preferences.
| General Feature |
Description |
| Browser notifications |
An option to display a notification when a new message is received |
| Sounds |
Play a sound when a new message is received. |
| Composing |
Choose whether pressing the Enter key will send the message immediately. |
| Conversations |
Automatically assign the conversation to yourself when sending a message to initiate the conversation. |
|
| Email notifications |
Choose whether you’ll receive an email notification for new and or assigned conversations.
| Email
Feature |
Description |
| New conversations |
An option to display a notification when a new message is received. |
| Assigned conversations |
Receive an email notification when a conversation is assigned to you by someone else. |
|
| Date and Time |
Choose the hour and time format, pick between 24- or 12-hour formats and choose if you would like to see the time in absolute or a relative format.
| Date&Time Feature |
Description |
| Hour
format |
Put the format for how dates and times are shown in Mitto Conversations. Choose 24-hour which writes the time using military format, or 12-hour which shows the time using regular format. |
| Time
format |
Choose whether you want to see times in an absolute format like 20:20 or a relative format like 24 min elapsed since you received a message/acted on a message. |
|
|
| Profile |
The Profile panel opens. You can do the following:
| Screen Feature |
Description |
| Name
Upload photo |
Use the first field to enter your first name or nickname (this will show on your communications with teammates and customers). Use the second field to enter your last name.
Drag and drop or choose an image you want to be visible when someone sees your profile. |
| Color |
Click the circle to choose the color you want for your profile. |
|
| Security & sign in
Sign out |
| Screen Feature |
Description |
| Password |
This section provides instructions for how to create a strong password. If you want to change your password, you must enter your existing one in the Current password field and then use the new password field to enter your new password. Use the Confirm password field to repeat what you put in the new password field. Click Change. If everything is correct and the new password matches with the confirmed password, you will get a notification confirming your success. Otherwise, you get a notification that explains what went wrong. Notifications appear in the lower left corner of the screen. When you are done setting your password, click Save. If you choose not to set your password, click Cancel. |
| Two-factor authentication (2FA) |
Scan the QR code with the authenticator app (Google Authenticator, Microsoft Authenticator, or any other authentication apps) on your phone to enable two-factor authentication. After receiving a 6-digit code, enter it into the window to enable 2FA. |
|
|
If you click Sign out, you are immediately logged out. |
If you click the bell, it toggles your alerts on and off. It’s recommended you leave alerts on.
If you click the arrow pointing left, you can collapse the menu so it’s just icons instead of the complete name of each section.
Conversations
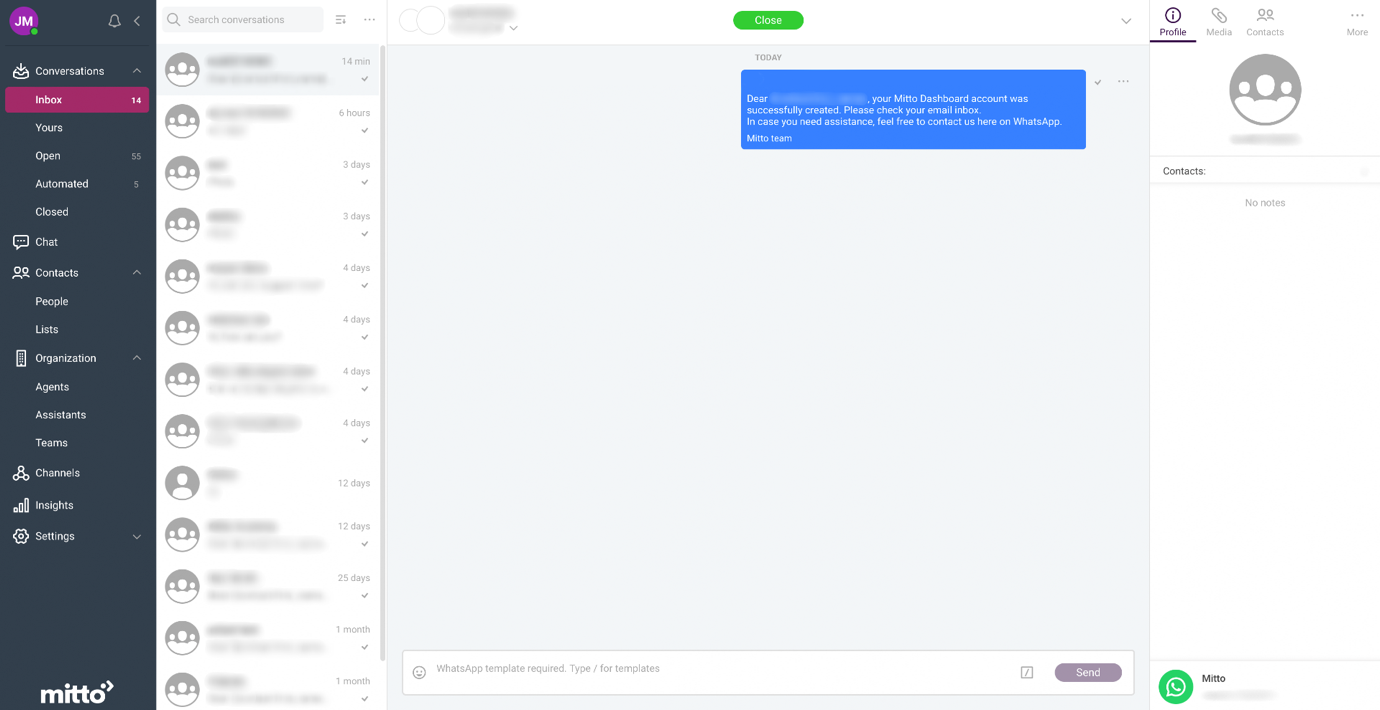
The Conversations section keeps track of messages coming in from multiple channels. You can see the name of the person messaging you, and when you open their message, you can see how you will need to respond. For example, in this image, at the bottom you can see the Business initiated conversation. By sending a WhatsApp template to the customer, your customer will respond you on the same channel. Similar notifications appear if your customer uses Viber or another platform.
The table describes all the features on this screen.
NOTE: The Inbox only shows messages that are open or assigned to you.
| Screen Feature |
Description |
| Search conversations
Order menu |
At the top of the Conversations section, you’ll notice a Search conversations bar. You can search by message content or title. The search bar is not restricted to your messages or open messages. It will retrieve messages assigned to other members of the support team as well.
Sort your conversations by oldest/newest or by longest waiting/shortest waiting. |
| Three dots |
If you click the three dots to the right of Search conversations, you open a pop-up menu that lets you set up message filters.
| Screen Feature |
Description |
| Sort by newest / Sort by waiting duration |
This is a toggle feature, click the one that helps your search most. Sort by newest will put the newest messages at the top of your inbox. Sort by waiting duration will put customers who waited the longest for a response at the top of your inbox. |
| Priority inbox |
This is a toggle feature that goes with labels. If you implement labels, you choose whether a label is normal or high priority. Anything marked with a high priority label will go to the top of your inbox if you choose the Priority inbox filter. |
|
| Unassigned/Assigned drop-down |
This drop-down is under the name of the customer that you wrote you in the message you highlighted in the Inbox. You can assign them based on Agents, Teams, Labels or Assistants. When you click one of the choices, the search bar underneath dynamically updates to let you search under that category. You can assign the following:
- Agents – Choose a support member by searching for them individually. You can choose yourself or someone else. After you choose, you will be able to see it displayed under Revoke form. If you click on your choice, it will remove the assignment.
- Teams – You can choose a team to assign to from this drop-down. It’s possible to assign to a team and an individual. After you choose, you will be able to see it displayed under the Revoke form. If you click on your choice, it will remove the assignment.
- Labels – You can assign one of the labels you created here. Labels can have whatever title you want, and they are either normal or high priority. When you choose a label, it appears next to the message. You can also remove the label by clicking on it next to the name of the customer when you highlight their message.
- Assistants – If you’ve opted to set up an AI to help with particular customer scenarios, you can find them here and assign an assistant to work with a customer.
|
| Close button
Dropdown arrow
Profile
Media
Lists |
If you complete a conversation with a customer, you can click the Close button to close the conversation. Closed conversations can be reopened by an agent or the customer (if the customer initiates the conversation again) at any time.
| Screen Feature |
Description |
| Mark as unread |
Mark the conversation as unread so other agents can be notified that there is a new conversation waiting to be opened. |
| Copy link |
Copy the link of the conversation and easily forward it to another agent within the Chat part. |
| Hide Contact profile
Print… |
Hide all contact information that you see on the right side of the screen.
Print the entire conversation. |
See the entire profile of a contact.
See all the media messages exchanged with the customer.
Check which lists this contact is part of. |
| … More |
The More menu offers choices for what you can do with the contact information listed for the customer whose conversation you have highlighted.
| Screen Feature |
Description |
| Edit contact |
This opens the Edit contact panel where you can edit the name of the contact. You can add or update reference information for the customer if you track them using a number or similar. And you can add remarks and notes about any interactions you had with them. When you are done, click Save to save your changes. Click Cancel to close out without any changes. |
| Create note |
Use this feature to add a note about a contact, in which case it will appear any time anyone accesses the contacts information. Or use it to add a note to a conversation, in which case the note will only appear when anyone accesses the conversation you selected. Type your note, then click Save to save your changes. Click Cancel to close out without any changes. |
| Add to favorites
Block contact |
If you speak with a contact often, you can choose to add them to your favorites. This makes it easier for them to speak with in the future. If you set a contact to be a favorite, this feature toggles to Remove from favorites.
If you believe that the contract is incorrect or the contract is violating the regulations of your company, you can block them. The contact can be unblocked at any time. |
| Delete |
You can delete a contact altogether. This is permanent, so make sure you really want to delete them before clicking the button. |
|
The rest of the Conversations section has different sets of filtered messages. They include:
- Inbox – All messages that are open or assigned to you.
- Yours – All messages that are assigned to you.
- Open – All open messages that no one has assigned to someone.
- Automated – All messages that are being handled by an assistant.
- Closed – All messages that are closed.
For details about the search conversations feature, the three dots, the drop-down under the customer’s name, or the profile section to the right, please see the table above. All of that is explained there and repeats in the different sets of filtered messages.
Chat
The Chat section groups any ongoing chats together. Chats are only between you and other agents working with customers. You can review existing chats in the main window, open a chat for more details, or start a new chat by clicking the Chat button at the top of the screen.
The table describes the features in the Chat section:
| Screen Feature |
Description |
| Search chats |
You can search through all chats by typing in whatever you are looking for, either content or a contact’s name. |
| Drop-down next to highlighted contact |
In the middle of the screen the chat you highlighted to read or add to is presented. At the top is the name of the channel or contact you are speaking to. If you click the drop-down you get two choices:
- Mark as unread/Mark as read – Depending on whether you marked it read or unread, the other choice will show.
- Hide or show the contact profile
- Print – This lets you print the chat message out for reference.
|
| Profile panel |
The Profile panel on the right is similar as for Conversations with limited possibilities. You can create a note about the contact or delete the entire conversation. |
Contacts
The People screen shows you all the people you have selected as your favorite contacts. Their most recent communication appears when you click on their name. All the features on this screen are the same as they are for Conversations, so you can review that section for more details about the Profile panel on the right.
The only different features are:
- Search contacts – You can search for any contact or team member with this search bar.
- Add button – You can add a new contact by clicking the Add button. This opens the Add contacts wizard.
Add Contacts Wizard – Manual
The Add Contacts Wizard takes you through a set of screens that make it easier to add your new contact.
- Add contacts – Choose whether you will manually add a single contact or import a file containing multiple contacts. For this section, we choose Manual.
- Select channel – Choose what channel you will use to communicate with the contact.
- Click Next.
- Add contacts – Add the name, phone number, reference, and remarks for the contact. Reference is usually a customer ID or way of referring to the customer other than their name in your system. Remarks are anything you want to say about the contact. When you’re done, click Add. Or, if you change your mind and want to import a file or change the communication channel, click Back.
Add Contacts Wizard – Import
The Add Contacts Wizard takes you through a set of screens that make it easier to add your new set of contacts.
- Add contacts – Choose whether you will manually add a single contact or import a file containing multiple contacts. For this section, we choose Import.
- Select channel – Choose what channel you will use to communicate with the contact.
- Click Next.
- Existing contacts – If you are updating existing contacts, choose Update. The system will try to update existing information for you. Otherwise choose Ignore. The new contacts will be imported without checking for duplicates and updates.
- Delimiter – Because you are uploading a CSV file, choose whether fields are separated by a comma or a semicolon.
- For your CSV file, the field names are: name, phone number, reference, remarks. Reference is usually a customer ID or way of referring to the customer other than their name in your system. Remarks are anything you want to say about the contact. You do not have to provide all of them, but make sure you include a delimiter for anything you leave blank.
- Click Choose File. Add the file you want to import from. A preview of the contacts will appear under the file where it says No contacts uploaded. Make sure they look okay. If not, you may need to tweak your CSV file.
- When you are done, click Import. Or, if you change your mind and want to manually add a contact or change the communication channel, click Back.
NOTE: All your contacts in the file should use the same communication channel as you can only add one option.
Add Contacts Wizard – List
The Add Contacts Wizard takes you through a set of screens that make it easier to add your new list.
- Set a name, reference, and a remark for the new list you are creating.
- Select channel – Choose what channel you will use to communicate with the list.
- Click Next.
- Existing contacts – If you are updating existing contacts, choose Update. The system will try to update existing information for you. Otherwise choose Ignore. The new contacts will be imported without checking for duplicates and updates.
- Delimiter – Because you are uploading a CSV file, choose whether fields are separated by a comma or a semicolon.
- For your CSV file, the field names are: name, phone number, reference, remarks. Reference is usually a customer ID or way of referring to the customer other than their name in your system. Remarks are anything you want to say about the contact. You do not have to provide all of them, but make sure you include a delimiter for anything you leave blank.
- Click Choose File. Add the file you want to import from. A preview of the contacts will appear under the file where it says No contacts uploaded. Make sure they look okay. If not, you may need to tweak your CSV file.
- When you are done, click Import. Or, if you change your mind and want to manually add a contact or change the communication channel, click Back.
Organization
The Organization section has three different groups:
Agents
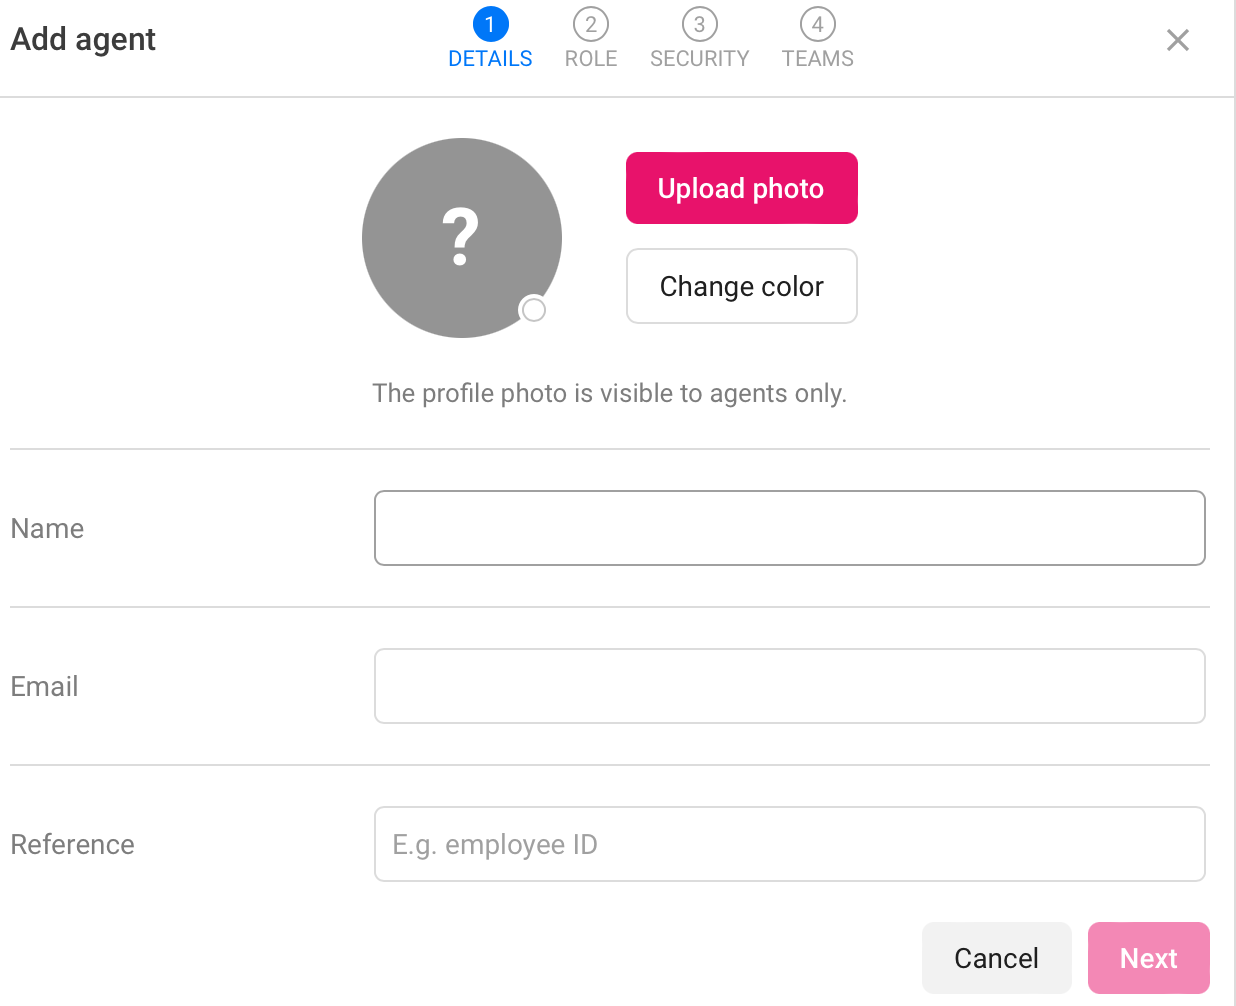
Agents are any employees assigned the task of answering customer communications. You can see a list of agents by clicking this choice from the menu. Using the search bar at the top of the page, you can look for a specific agent. You can also add a new agent by clicking the Add button. If you do that, you get this screen:
| Screen Feature |
Description |
| Details |
| Role |
Description |
| Name |
The name of the person you want to add as an agent. |
| Email |
The email of the person you want to add as an agent. They will receive an email inviting them to sign up. |
| Reference
Color
Photo |
Reference is usually an employee ID or way of referring to the employee other than their name in your system.
Choose the default color you want the person to start with when they join as an agent.
Upload a photo |
|
|
|
| Role |
Select the role of every agent in your company.
| Role |
Description |
| Basic |
Basic role allow agents to see only their conversations and use labels and quick replies pre-configured by users with the higher permissions. |
| Standard |
Allow agents to do everything except change settings and add new users. |
| Administrator
Additional privileges |
Administrator privileges allow them to change any settings they like and see the Insights by default.
You can assign to a specific agent that has Basic or Standard role to have the access to Insights. |
|
| Security
Select teams |
Two-factor authentication can be added by an authenticator app and can be used by this agent to sign in providing an extra layer of security.
You can choose what team you would like the person to be a member of. A person can be an agent for multiple teams, no teams, or one team. |
| Invite |
Click Invite to add the person as an agent. |
You can also click on an Agent, then click Edit at the top of the page to edit their privileges. The screen is the same except instead of an Add button at the bottom, you have a Save button. Agents with Normal privileges cannot change this screen.
Assistants
You must have the assistants feature enabled to see any available assistants.
Teams
Teams are composed of agents. You can set up the different teams you want to use to add agents to here. Search for teams using the search bar, or click Add to add a new team. If you click Add, you will get the Add Team Wizard.
Add Team Wizard
The Add Team Wizard lets you add a new team to your existing teams, or create your first team.
- On the Add team screen, enter a name for the team in the Name field.
- If you have a reference ID of some kind for the team, enter that for Reference.
- Choose a custom color for the team by clicking on the circle.
- Select stickiness. Choose whether the team will remain or be removed when a conversation is closed.
- Click Next.
- Enter an email address to which the notification will be sent when a conversation is assigned to this team. Check whether the status will be visible or not to others.
- Click Next.
- Set parameters such as Google Place ID and/or a phone number that are used for a conversation to be automatically assigned to this team if any of the following fields matches.
- Click Next.
- On the select Channels screen, choose which communication channels the team can work with. You can search for channels if there are many to choose from, or choose from what’s presented. Put a checkmark next to each channel.
- On the add Agents screen you can search for agents to include, or choose from those presented. Put a checkmark next to each agent you want to include in the team.
- Click Add to create the team.
You will be able to review the team by clicking on it. It will show all agents associated. Click the Delete button to delete the team or click Edit to edit the team. You will walk through the same screens as you did for adding a team, allowing you to make changes to communication channels, and agents that are associated with the team. Remove agents by unchecking the box next to them, or add a new one by searching for the person. At the end, instead of Add you click the Save button.
Channels
The Channels section shows you all the different communication channels your team uses to communicate with customers.
Review or Edit an Existing Channel
You can review or edit an existing channel by clicking on it.
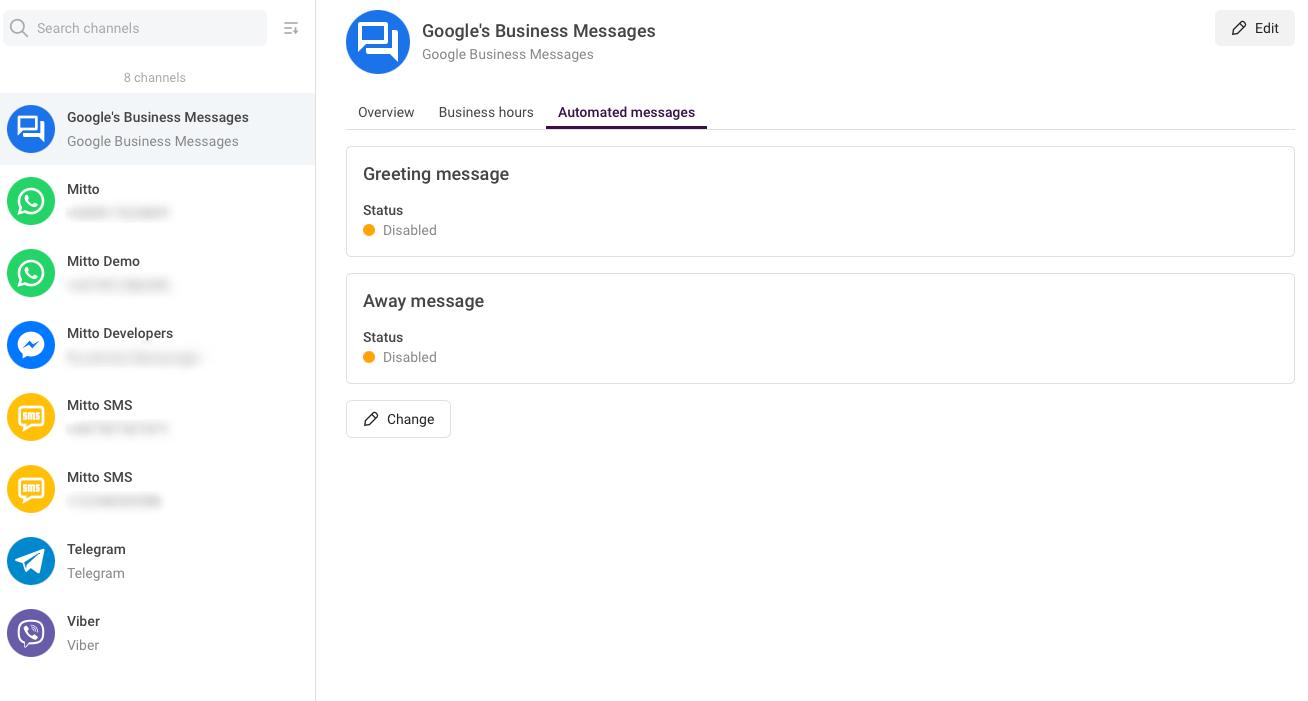

Add a Greeting or Away Message
For each platform, you can add a Greeting message and an Away message. These automated messages can be sent to customers outside of business hours. Do the following:
- Choose a communication channel.
- Click Automated messages.
- Click Chage and you will automatically be redirected to the Business hours part in Settings. See under “Settings” part.
- When you are done crafting your message(s), click Save.
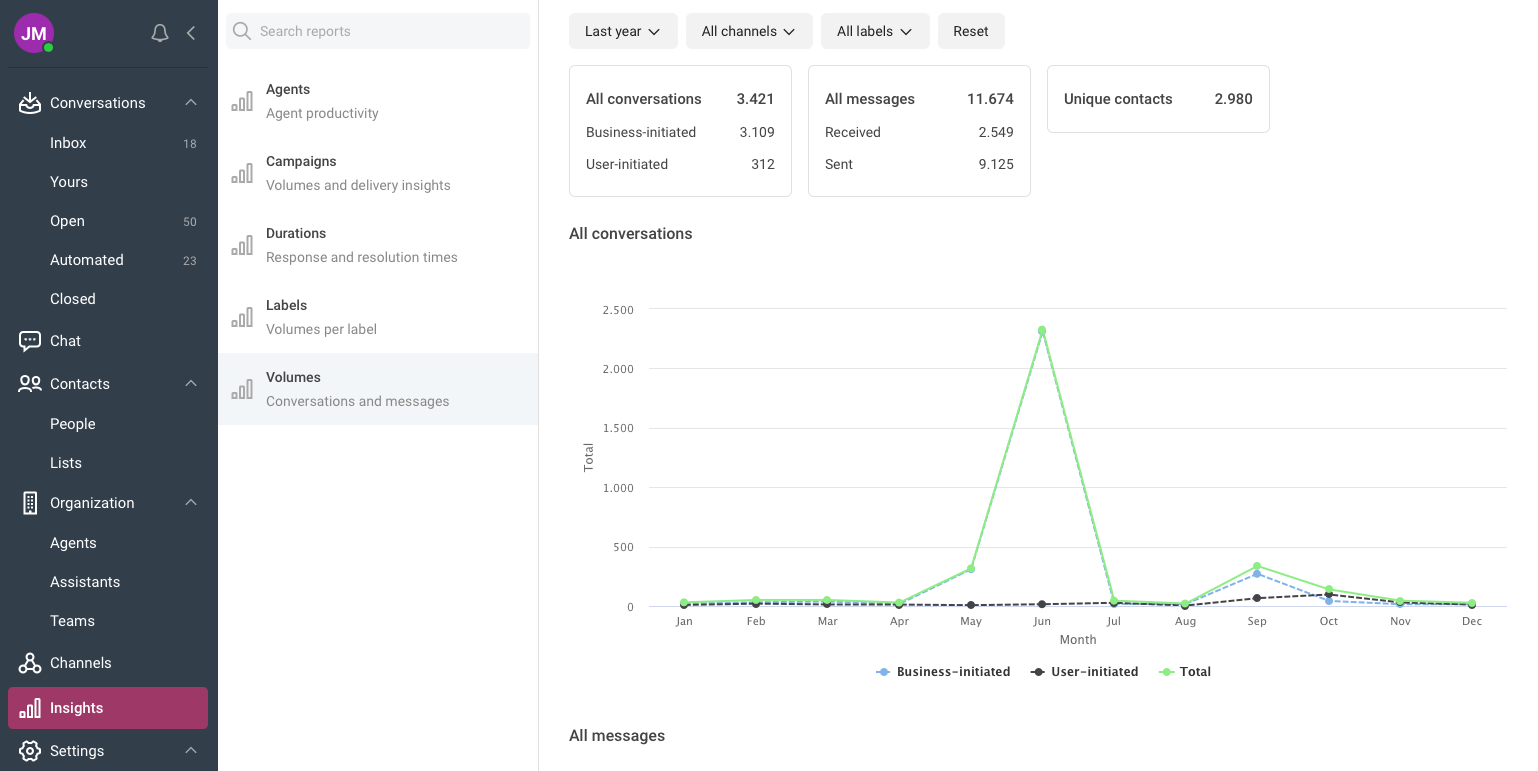
Insights
The Insights section gives you a detailed visual overview of:
You agent’s productivity – you can filter the agent by time, channel, and the name. You can pick one or more agents.
Campaigns volume and delivery insight – select a campaign by time and channel.
Durations of response and resolution times
Labels – See your volumes per a specific label – select a time and channel
Volumes of all conversations and messages – see a detailed number of all your conversations at once. Pick a specific time, channel and label to get more detailed overview.
Settings
The Settings section offers three subsections:
- Business hours
- Labels
- Quick replies
Add Business Hours
See existing business hours or add business hours for any communication channel. Add business hours by doing the following:
- Add the name
- Set the availability. For Availability, choose Always open, Selected hours or Permanently closed.
- If you choose the Selected hours option, a menu showing each day of the week appears. Check the box for each day you are open, then use the drop-downs to set the hours you are open. You are only able to list a single window of time for each day. Meaning that you couldn’t list a day’s business hours as from 2-4 and 8-10.
- Set your time zone and click Save.
After saving a specific Business hour you will be able to assign them to one or more Channels, Teams and/or Assistants. Any of these can also be easily removed from the initial setup. Also, you can edit initial settings at any time or delete the entire setup.
Labels
The Labels section lets you create labels to use messages.
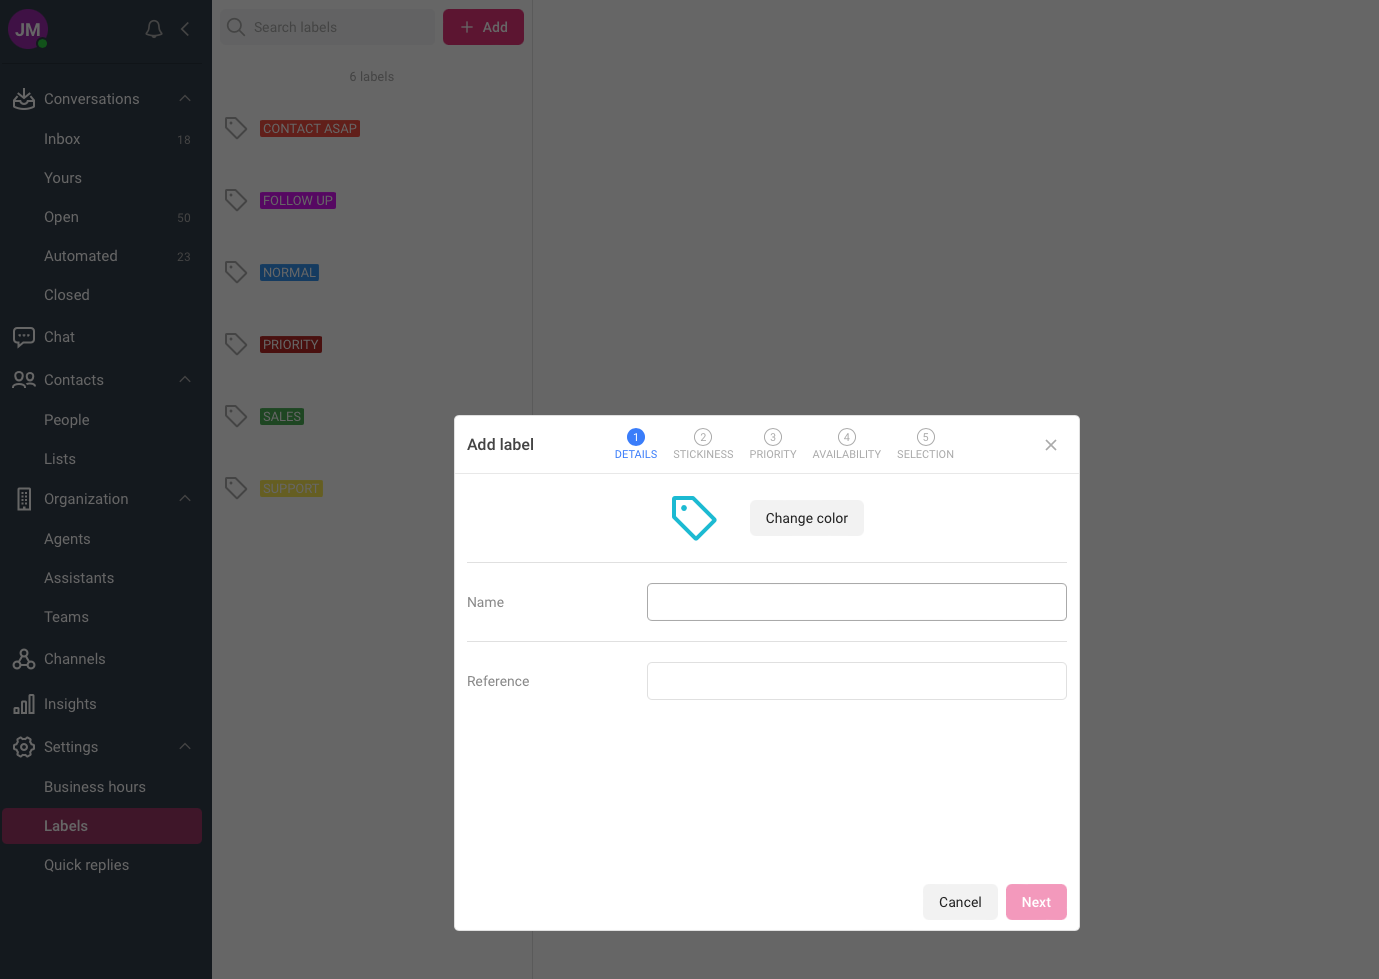
To add a label:
- Enter a label in the Name field.
- Choose a custom color for your label.
- Write a label Reference. Click Next
- Select the label’s stickiness, choose whether the label will remain or be removed when a conversation is closed.
- Select a priority for the label, either Normal to show the conversations with this label in normal order or High to move conversations with this label at the top of the list.
- Add the availability to the label. Select if the label is available for a certain channel, team or all.
- Click Save. The label will now appear as an option when you are reviewing customer messages and deciding who to assign them to.
You can edit or delete a label at any time.
Edit or Delete a Label
You can edit or delete a label by clicking on it and then choosing either delete or edit.
Delete a Label
To delete a label, highlight it and then:
- Click Delete.
- When you are prompted about whether you are sure you want to delete the label, confirm by clicking Delete again. This action cannot be undone.
Edit a Label
To edit a label, highlight it and then:
- Click Edit.
- You can change the name of the label in the Name field.
- Select the label’s stickiness, choose whether the label will remain or be removed when a conversation is closed.
- Select a priority for the label, either Normal to show the conversations with this label in normal order or High to move conversations with this label at the top of the list.
- When you are done click Save.
Quick Replies
The Quick replies section shows various templates for replies you can use to respond to customers if you don’t feel like typing out a new message for a common scenario. You can use the search bar to find a specific reply or create new ones. You cannot remove a quick reply, so be sure you really want to add one before doing so.
Add a Quick Reply
You can add a quick reply by clicking Add and then:
- In the Name field, enter a name for your quick reply.
- In the Message field, enter a message for the quick reply.
- Click Next.
- Under Availability, decide if the quick reply is available to all channels/agents or only you. Choose Only me for yourself, Channels to set a quick reply for a certain channel, or Teams to set the quick reply be available for the selected teams.
- Click Next
- In Selection part choose the channels you want to add the Quick Reply to.
- When you are done, click Save.
Add WhatsApp template if using a WhatsApp as a channel.